RPG Maker Day & Night Cycle Step-by-Step Tutorial
Learn how to build a day and night cycle system in RPG Maker using variables, events, and screen tint transitions.
All EnginesBeginner Tutorial~50 min
Video walkthrough
Watch the full build below, then follow the written step-by-step guide.
Good news: this system works in every version of RPG Maker. If your engine doesn’t have a demo on this page, just recreate the event commands shown below.
RPG Maker concepts you'll use
The core pieces you'll put together in this tutorial:
Confused by a term? Getting Started with RPG Maker breaks down the core concepts in clear, beginner‑friendly language.
What you'll learn today
Create a real in-game clock and a time display to transition your world from dawn to dusk and beyond. We will build exactly 3 events for this system:
1
Parallel event 'Game Time (Main)'
Handles Seconds → Minutes → Hours → Days rollover logic. This is the heart of your clock.
2
Parallel event 'Day/Night Tint'
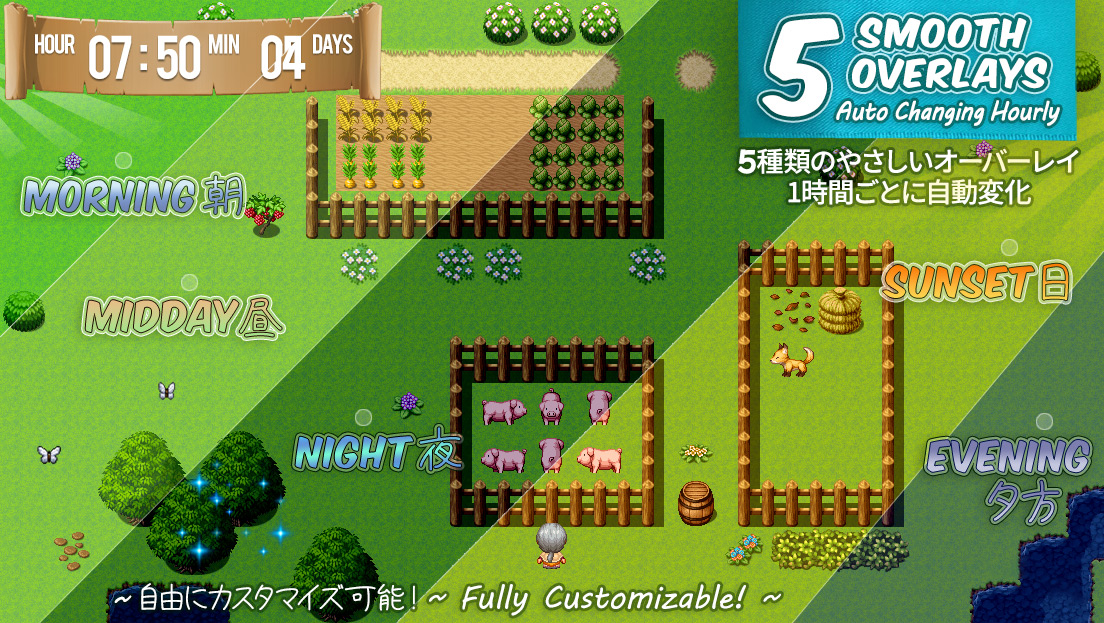
Checks the current hour and applies the correct screen tint (Night, Sunrise, Day, Sunset, Evening).
3
Autorun event 'Pre-Set Time'
Sets the starting time (example: 12:00 PM) and applies the correct tint before gameplay begins. Then disables itself using a Self Switch.
Great tip: If you're just testing, you can place your events on a map first. Once everything works as intended, you can always move them into Common Events for multi-map projects.
Download the demo & see it for yourself
Grab the ready-made demo project and watch the full day/night cycle run in your own engine.
Before we start
1
If you have MZ/MV
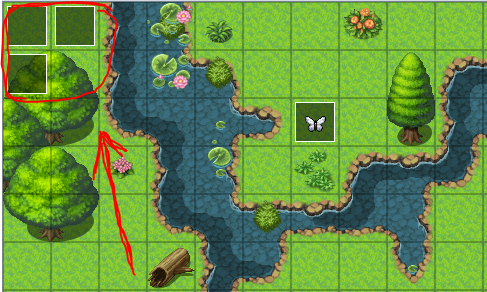
Download the demo file and open it in your engine of choice. The key event commands are placed in the top-left corner of the demo map for learning (one Autorun + two Parallel events).
2
If you use a different engine
Create the events manually in your own project. A clean way is placing the setup events in the top-left corner of a map first, then moving them into Common Events once you’re happy with everything.
Part 1. Create the Game Time (Seconds, Minutes, Hours)
First, we’ll make a Parallel event, then add Variables called Seconds, Minutes, Hours, and so on. Finally, simple Conditional Branches will let the game keep track of time.
1
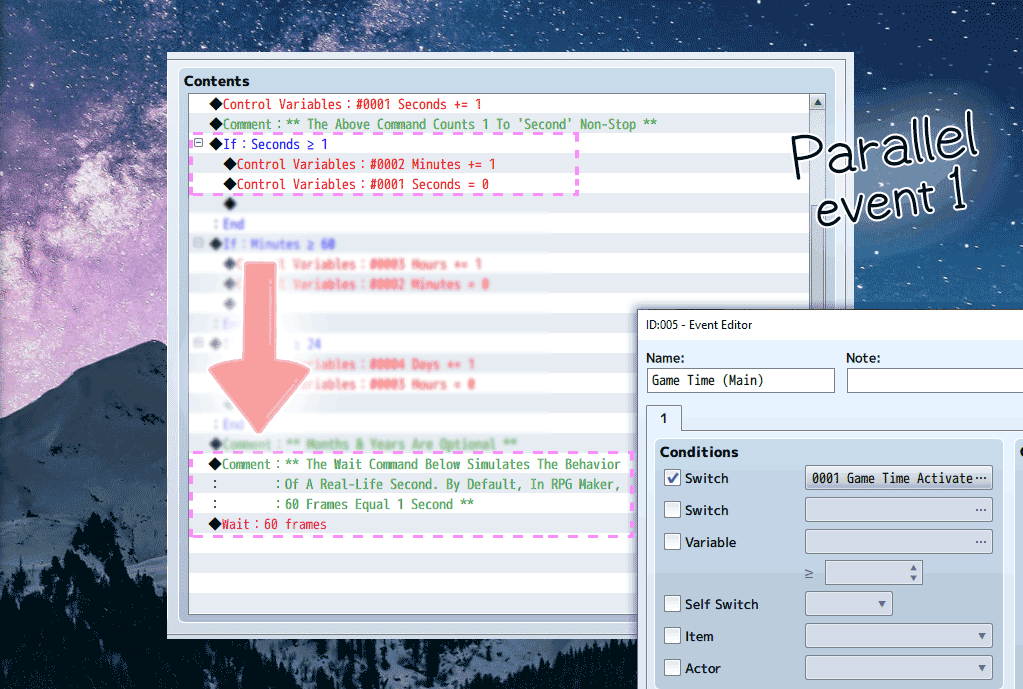
Create a Parallel event: “Game Time (Main)”
Make a new event and set Trigger to Parallel. This event will run continuously and update your variables.
2
Create variables
Go to
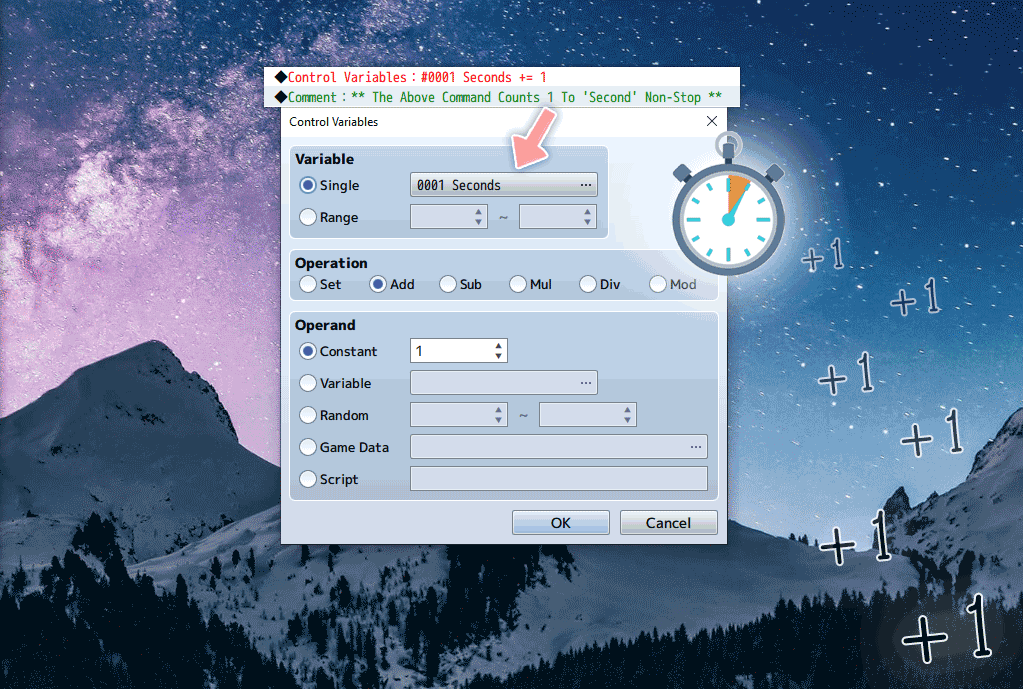
Control Variables > Single Variable. There we'll create variables for: Seconds, Minutes, Hours, Days, and optionally Months, Years.3
Make seconds tick
In your Parallel event, do:
Control Variables → Seconds → Add Constant 1Now Seconds will increase by one as the event runs.
4
How time will roll over
Now we need to tell the game how time should progress. Let’s look at the diagram below.
We’ll use these numbers to create our Conditional Branches.
The first branch checks whether Seconds are 60 or higher. If they are, we increase Minutes by 1 and reset Seconds to 0. The same pattern is then repeated for Minutes, Hours, and Days using the numbers shown above.
The first branch checks whether Seconds are 60 or higher. If they are, we increase Minutes by 1 and reset Seconds to 0. The same pattern is then repeated for Minutes, Hours, and Days using the numbers shown above.
5
Create First Conditional Branch
Add a Conditional Branch:
Inside the branch, add 1 to Minutes:
Reset Seconds back to 0:
Now Minutes will increase every 60 Seconds.
If Seconds ≥ 60
Inside the branch, add 1 to Minutes:
Minutes += 1Reset Seconds back to 0:
Seconds = 0
Now Minutes will increase every 60 Seconds.
6
Create The Remaining Branches
Repeat the same rollover logic for the rest of the branches:
If Minutes ≥ 60, then:Hours += 1 and Minutes = 0.If Hours ≥ 24, then:Days += 1, and Hours = 0.If Days ≥ 30, then:Month += 1, and Days = 0.
Optional challenge: Add Months and Years too, if you want to have seasonal changes or long-term events in your game.

Part 2. Time Display (so we can see it working)
First, we verify the variables update. Then we make a dynamic display that updates in real-time.
1
Quick test (recommended)
Place a simple object event (like a sign) and show a message using Show Text command that displays your variables.
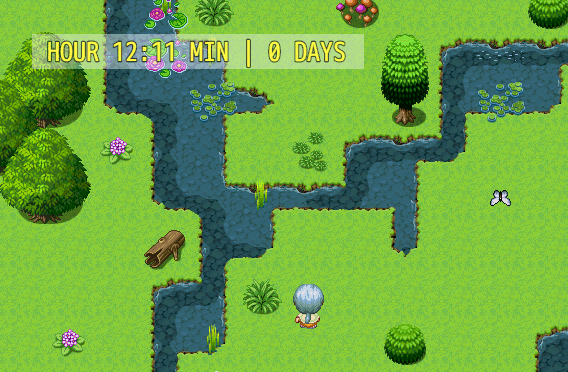
\V[1] Seconds | \V[2] Minutes | \V[3] Hours | \V[4] Days | \V[5] MonthsPlaytest! Click a few times on a signpost. If numbers change, your clock is ticking:
25 Seconds | 17 Minutes | 12 Hours | 1 Days | 0 Months
2
Make the display update dynamically
Use a Dynamic Text Picture plugin (MV users: DTextPicture.js / MZ: TextPicture.js). Turn it ON in Plugin Manager, then: add a Plugin Command that defines your text, and use Show Picture without selecting an image.
3
Use variables inside the text
Example: Hours is variable 3, Days is variable 4, then write
\V[3] (or \V[003] to display it. You can also add color with \C[].
Important: Make sure to assign a unique number to each image. Each picture needs its own picture ID, or they’ll overwrite one another.
Snippet Guide
Click on the image below to see code snippets for Part 2.
3 images
Part 3. Smooth Day/Night Tint (based on Hours)
Now we make the world “feel alive” by tinting the screen depending on the Hour.
Suggested tint schedule
The Hours variable counts in 24-hour time: midnight = 0, noon = 12, and 6pm = 18. That is why you check it with whole numbers like
Hours ≥ 18 instead of "6pm".Each phase is simply a range of Hours values:
Deep Night: Hours 0 to 5 (12am to 5am)
Sunrise: Hours 5 to 8 (5am to 8am)
Daytime: Hours 8 to 18 (8am to 6pm)
Sunset: Hours 18 to 20 (6pm to 8pm)
Evening: Hours 20 to 24 (8pm to 12am)
Deep Night: Hours 0 to 5 (12am to 5am)
Sunrise: Hours 5 to 8 (5am to 8am)
Daytime: Hours 8 to 18 (8am to 6pm)
Sunset: Hours 18 to 20 (6pm to 8pm)
Evening: Hours 20 to 24 (8pm to 12am)
Steps (2)
1
Create a Parallel event: “Day/Night Tint”
Make a second Parallel event (or Common Event) that checks Hours and applies the correct tint.
2
Use conditional branches by hour range
Build five branches based on military time, where '0' is midnight and '18' is 6PM. Example:
If Hours ≥ 20 then Evening tint, Else If Hours ≥ 18 then Sunset, Else If Hours ≥ 8 then Day, Else If Hours ≥ 5 then Sunrise, Else →
Deep Night.
Pro Tip: Keep tint durations slightly longer (at least 30-60 frames) so transitions don’t feel harsh.
Part 4. Start the game at a specific time (like 12pm)
By default it starts at midnight. Let’s pre-set the clock and apply the right tint.
1
Create an Autorun event: “Pre-Set Time”
Set the event trigger to Autorun, set Hours/Minutes to what you want. For example, for noon (which is 12:00pm), set Hours to 12 and Minutes to 0.
Control Variables → Hours → Set 12Apply a Daylight tint so you don’t start with night colors.
Control Variables → Minutes → Set 0
Tint Screen: (0,0,0,0), 120 frames
2
Turn it off with a Self Switch
Add a new page conditioned by Self Switch A, and turn Self Switch A ON at the end, so the Autorun doesn’t freeze the game.
Important: Make sure to deactivate the Autorun event, otherwise it’ll loop endlessly and freeze the game.
Snippet Guide
Click on the image below to see code snippets for Part 3 & 4.
4 images
Part 5. Optimization (make it run smooth)
Parallel events can be heavy if they check too often. Let’s reduce unnecessary work.
Performance checklist
✔ Trigger events only when needed
✔ Minimize frame checks
✔ Use Wait commands strategically
✔ Minimize frame checks
✔ Use Wait commands strategically
1
Use a Wait command (60 frames = 1 second)
Our system now constantly checks if the ‘Seconds’ variable has hit 60:
If:Seconds ≥ 60 <-- drains resources and can slow gameplay down!Let’s fix that in two easy steps! First, change the check from 60 to 1 to prevent overloading the system:
Conditional Branch → Seconds → Set 1Won’t this make the game count seconds way too fast? That's right! If we stop here, the game will think each second equals a full minute. So that’s where a Wait command comes in!
Wait: 60 framesA simple Wait command at the end of your Parallel event prevents the engine from running checks 60 times per second. It keeps the system smooth without unnecessary processing.
Fun fact! If you skip the Wait command, time in your game will fly by at lightning speed! I found this exciting and used it in the Pro version to demonstrate the mechanics in action 😅
2
Same idea for the tint event
Your tint event is also Parallel, without a wait command, it can keep reapplying tint constantly (multiple times per second!). Add a Wait command at the very end of this event to limit checks and avoid draining resources.
Good to know In the Pro version of the system, I’ll show you how to create a Smart System that makes the screen tint to change only when the hour changes!
Snippet Guide
Click on the image below to see code snippets for Part 5 💛

2 images
Free extras! Make events react to time
Did you know? You can make your game world respond in so many fun ways!
Steps
1
Make Events React to Time
Make house windows open/close, lanterns light at night, fireflies appear, or set shops open between set hours.
2
Global Time
Apply time cycles to the world map with ease! Plus, learn how to adjust game time speed (fast-forward effect included as a fun mini-game!)
3
AM/PM Format
Set a beautiful custom HUD with 12-hour time display.
4
Freeze the clock
Pause Time during dialogue, cutscenes, or emotional moments.
5
Boost Performance
Even more smart optimizations and pro tips to keep your game running smoothly.
Want the upgraded version? The Pro version adds global time, custom HUD, time-speed control, and smart optimizations. Expand for free! Simply join the Anya & Lolo Club to get a special link sent straight to your inbox 💌
🚀 Where to go from here
You've built a full in-game clock, seconds to days, a live time display, smooth day/night screen tints, a custom start time, and performance optimizations. Nicely done! ☀️🌙
The free Pro version takes it further: world-map time cycles that shape your entire game, a dynamic picture-based HUD, events that react to the clock (lanterns lighting at night, shops open 9AM-6PM), an adjustable time-speed fast-forward mini-game, and Smart System optimizations that keep everything running smoothly, plus extra tutorial content.
🎁 It's free for subscribers, just join the Anya & Lolo Club and your exclusive download link lands straight in your inbox 💌
Want to try it? Play the full Pro demo right in your browser, no download needed, or join the Anya & Lolo Club to grab the free MZ/MV files.